


Northern Lights Photography: Tips for camera & phone
Seeing the Northern Lights is an unforgettable experience, and capturing them on camera allows you to relive that moment forever. However, photographing the aurora isn’t as easy as you might think. It requires the right equipment and settings, and a few tips and tricks from the pros (yes, that’s us 😏) can come in handy.
What could be a better souvenir from your trip to Lapland than an amazing photo of the Northern Lights, right? Whether you’re using a professional camera or just your smartphone, this guide will help you take stunning pictures of the Northern Lights.
Before you head out into the wild, it’s important to get well prepared for your adventure. The Northern Lights are visible from late August to April, and your chances of seeing them increase the further north you go beyond the Arctic Circle. Check the weather forecast, choose a location with minimal light pollution and dress warmly. Check out our tips for catching the aurora for more details.
Photographing the aurora with a camera
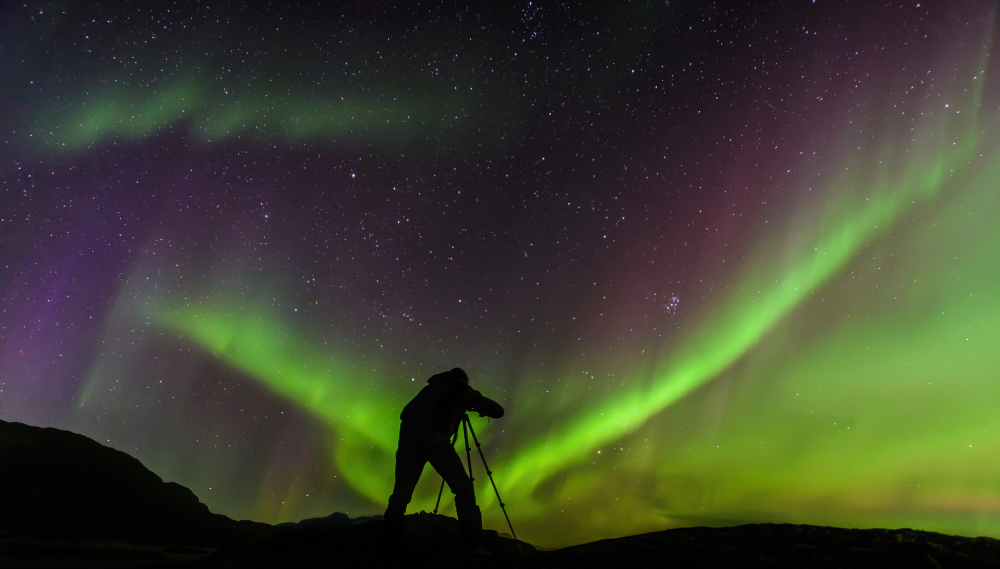
When photographing the Northern Lights, you’ll need to use long exposure times as this is the most common way to capture them. Using long exposures requires absolute stability, even the slightest movement can blur your image. A good tripod will make all the difference.
How to choose the right camera?
When it comes to choosing a camera and lens, it’s better to go for a full-frame camera as it has better sensitivity, and a wide-angle lens with a large aperture (e.g., ƒ/2.8). Here are some good and affordable camera and lens combinations:
- Canon RP with Canon 16mm 2.8 lens;
- Sony A7III with Samyang 18mm 2.8 lens;
- Fuji XT-5 with Fuji 18mm f/1.4 lens;
- Lumix GH5 II with Summilux 15mm f/1.7 lens.
Each camera is different and not all of them work well in low-light conditions, so take the time to practice taking photos of the night sky and familiarise yourself with your camera’s settings before you go on a Northern Lights hunt. Also, remember to always shoot in RAW, as these files contain more detail and give you more flexibility in post-processing.
Let’s talk camera settings
One of the most important parts of photographing the aurora is to switch to manual mode, which allows you to control shutter speed, aperture, and ISO – the three key settings that determine how light is captured in a photo. These three elements form what photographers call the Exposure Triangle, which visually explains how these settings work together to create a properly exposed image.
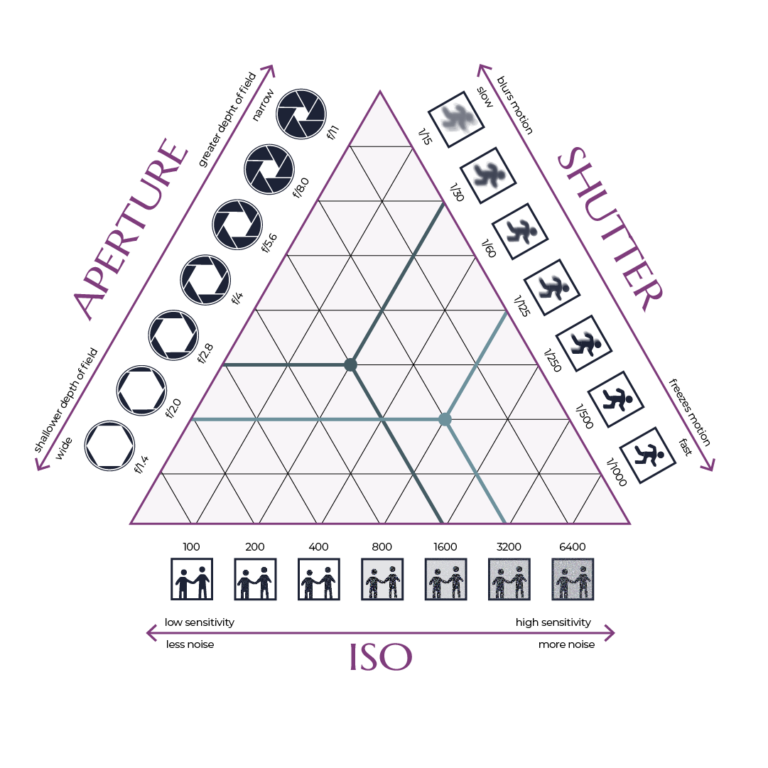
The shutter speed controls how long the camera’s sensor is exposed to light. Use a slow shutter speed, typically between 3 and 25 seconds, depending on the movement and brightness of the lights. If the Northern Lights are moving quickly, set the shutter speed to 3-7 seconds; otherwise try 10-25 seconds, especially if the lights are not very bright.
The amount of light entering the camera is determined by the aperture, which controls the opening of the lens. The wider the aperture, the more light is let in, so set it as wide as your lens will allow. For the best Northern Lights shots, use an aperture between ƒ/1.4 and ƒ/2.8.
ISO is the camera’s sensitivity to light, and it affects brightness in low-light conditions. It may seem that a higher ISO would work well for capturing the aurora, but it creates noise and reduces image quality. For best results, keep the ISO as low as possible while and balance it with the aperture and shutter speed to capture enough light without excessive graininess. A recommended ISO setting is typically no higher than 5 000.
Finally, set your lens focus to manual and aim at the brightest star in the sky. This will ensure that your images are as sharp as possible and that the Northern Lights remain in focus. Turning on the peaking display can also help you. It’s a manual focus assistant that highlights the areas of your image that are in focus. Autofocus may struggle in the dark, so using manual focus is the best option.
Bonus tips for using a camera
- Batteries tend to drain faster in colder temperatures, so keep extra ones close to your body to keep them charged;
- Bring a pair of thinner gloves to operate your camera without freezing your hands;
- Bring a headlamp or flashlight to help you set up your camera quickly and easily in the dark.
How to take photos of the Northern Lights with a phone?
If you don’t have a camera, don’t worry! Most smartphones these days are smart enough to capture the aurora. Keep reading, you can thank us later!
For the best results when photographing the Northern Lights with your phone, switch to manual or pro camera mode if your device supports it. Many Samsung models, such as the Galaxy S and Note series, include a Pro mode that allows you to control key settings such as ISO, shutter speed, and focus, which are crucial for low-light photography. If possible, shoot in RAW format rather than JPEG.
Many iPhones now come with a built-in Night Mode that allows you to take photos in low light conditions by extending exposure time and reducing noise. iPhone models, starting from iPhone 11 series, have this option that activates automatically in dark environments. This feature is particularly useful if you’re unfamiliar with manual settings. Night Mode can work surprisingly well in some cases, but results will vary depending on your phone model and lighting conditions.
Another useful tip is to use a primary lens (1x), rather than an ultra-wide lens (0.5x). A wide lens may seem like a good option to capture more of the sky, but unfortunately, it captures less light, which means the aurora appears weaker. The main lens on smartphones is better equipped for low-light photography and will give you much better results.
Avoid using a flash when photographing the Northern Lights, as it won’t help illuminate the sky and may even interfere with your or other people’s shots. Flash is designed to brighten up close subjects, so in a dark outdoor environment, it will only create unwanted glare. Instead, focus on adjusting the settings to capture natural light, which lets the aurora’s glow to stand out against the dark sky.
Similar to taking photos with a camera, it’s useful to have a tripod. A sturdy tripod will keep your phone steady, allowing you to take sharper, more detailed photos.
Still not sure about your photography skills? We’ve got you covered!
Some tour operators, including ours, offer Northern Lights photography tours led by experienced photographer guides. They are equipped with professional cameras and they know the best locations to view the aurora. Our guides will take photos for you and, if you’d like, teach you the essential tricks to get the best Northern Lights shots yourself.
It can take some time to learn how to take good pictures of the Aurora, but everyone has to start somewhere, right? So let this guide be your best friend as you learn! The more you practice, the better your photos will be. Before heading out, remember not only to check the forecast and layer up, but also to familiarise yourself with your device’s settings so you are ready when the aurora appears. With patience and the right techniques, you’ll be able to take stunning photos of this magical phenomenon.